Sunday, 14 May 2006

Homemade Pasta - Fettucine with Porcini

After many indecisions, we finally bought a pasta machine... Hurray! It's an Imperia, just like this one:

We are quite pleased with it so far: it is not the type of gadget that one is going to use everyday, but hopefully it won't be only gathering dust in the pantry.

Our first attempt at making pasta at home was successful. We thought about a sauce that would bring out the freshness of the pasta without overwhelming it, and came up with the idea of a porcini-based sauce using some milk. We made the sauce before tackling the pasta, just to get that out of the way.

Ingredients for the sauce:
- 40 g of dried porcini
- milk
- one small onion, finely chopped
- one garlic clove
- one bay leaf
- salt, pepper, nutmeg

Soak the mushrooms in a cup of boiling water for half an our. Heat some olive oil in a large saute pan. Press on the garlic clove with the side of a knife, and let it colour in the olive oil, along with the bay leaf. When the garlic is golden, add the onion. Let it fry gently without colouring. Squeeze as much water as possible from the soaked mushrooms, and coarsely chop them. Reserve the soaking liquid and strain it through a fine sieve. Add the mushrooms to the sautepan and let them fry for a few moments. Add the soaking liquid, let it get to the boiling point, reduce to low heat and slowly simmer until most of the liquid has evaporated. Season with salt, pepper, a bit of nutmeg. Add then about half a cup of milk, and reduce to a nice creamy sauce.

Ingredients for the fresh pasta:
-350 g of white bread machine flour
-2/3 eggs

We basically followed the instructions that came with the machine, but had to improvise a bit here and there. Various sources suggested different number of eggs for the same amount of flour. We decided to try to use as little egg as possible, and followed the instructions that came with the machine: 350g of flour and two (large) eggs. This was not enough, and a third egg was used. Below is a rough description of the whole process:
  1. Pile the flour on a working surface and make a well in the middle. Put the eggs (2 initially) inside this well, and with a fork start incorporating them into the flour, sort of like making cement. The eggs should bind all the flour; if not, add another one. Knead the flour by pushing it away from you, on top of the surface, with the back of your wrists. If necessary, add a few drops of warm water. The final consistency should be plasticine-like, without sticking to your fingers. Make a ball with the dough, put it in a bowl, cover with a damp tea towel, and let it rest for half an hour.
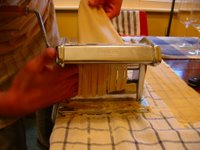
  2. Knead the dough a bit more, and cut it in 6 pieces. Cover the pieces of dough with a damp tea towel to avoid them drying up. Grab a bit of dough and pass it through the rolls, starting with the widest setting. Fold the sheet in two each time, and repeat 3-4 times. Gradually reduce the separation between the rolls, until you reach the thinnest setting. At this point, you should have a thin, long sheet that must dry for a bit before cutting. We hanged ours on a clothes drying rack:
  3. Before starting the cutting process, the dough must not be too wet. If it is, it will jam the machine. It should not be too dry either, as it will just crack when in contact with the blades. Cut each of the sheets of dough in half lengthwise, and pass each one through the cutter. Hang the fettucine again on the racks, as they should dry a bit more before cooking.
  4. Heat a large quantity of water in a big pot. Add salt. When it reaches the boiling point, add the fettucine. We did this in two batches. It takes literally a minute or two to cook the pasta, so be careful. Put the pasta directly in the sautepan containing the sauce, and add a bit of the cooking water to thin it. Fresh pasta seems to soak a lot of sauce, which on the one hand is good, but on the other can be a bit problematic, so the cooking water can be quite useful. Eat at once!

Monday, 8 May 2006

Spinach Risotto

We bought a beautiful cookbook called French, by Damien Pignolet, the idea being that this is one of the few cuisines about which we don't have a book. Needless to say, the recipes are very sophisticated --- and time-consuming, but we are very interested in experimenting with the ideas found in this excellent book.

We started with something not very complicated --- but hardly French. The author of the book argues that in certain regions of France, due to the geographical proximity, people do indeed traditionally cook pasta and riso, and hence he includes a chapter on these things.


I am not going to explain how to make a risotto here, and we followed the recipe very loosely. The interesting part of this dish is that we quickly boiled a whole bag of spinach, squeezed out as much water as possible from the leaves, and then pureed them. You are left with a very small amount of very deep-coloured green puree, that is added to the risotto during the final stage, when the riso is almost cooked and one just adds a bit of butter and grated parmesan --- the mantecare stage.

The result is very good and beautiful to look at. Very velvety...

Monday, 1 May 2006

Pappa al Pomodoro

Tomato soup is a quite popular lunch treat in England - at least the tinned variety is certainly very common! This has excited our curiosity about this dish, and for some time we kept our eyes peeled for interesting recipes for the real kind of tomato soup: the one that does not come out of a can. We have a Jamie Oliver book that features such a recipe, but for some reason we never felt really compelled to trying it out. To summarise, the whole thing has been in the back of our minds for some time.

One of these days I stepped into a Border's and as usually browsed through the wine/gourmet/cookery magazines. One in particular caught my attention: Saveur. It featured an article about Buffalo wings, a dish we had tried just a few days before, but also seemed to have several recipes/articles worthy of a more careful reading. I decided to buy it. Inside there was this interesting article about Florence trattorias, and with it came a recipe for a sort of tomato soup: pappa al pomodoro. It seems to be a very typical Tuscan dish, there are tons of recipes for this soup on the web. The one featured in the magazine is somewhat different from most we saw, and apparently it's this soup that is served at a trattoria called Coco Lezzone. We strongly recommend it! The recipe we are going to write down is the one we actually implemented, obviously a slight variation on what is described in the magazine...

Ingredients:

-4 tins of good-quality plum tomatoes
-2 leeks, white and pale green part only, washed and finely chopped
- a couple of slices of stale bread (the rougher the better)
-1 cube of organic chicken broth (sorry!)
-2 cloves of garlic, peeled and finely chopped
-olive oil, salt, pepper, basil leaves

In a Le Creuset-type pot, heat a few slugs of olive oil. When the oil is hot, add the garlic and let it sizzle until it loses the rawness. Next, add the leeks, turn the heat down and let them slowly sweat, stirring often. No rush, the slower the better. Once the leeks are nice and cooked, add the tomatoes. What I do is to make sure the rougher part of each tomato is discarded, and I sort of squeeze each tomato in my hand so that it goes into the pot almost as a paste. I used the seeds and the juice also. Dissolve the cube of organic chicken stock in 1/2 a liter of boiling water and add this stock to the pot. Turn the heat up to get to the boiling point, and then turn it down and let the soup simmer for a good 30-45 minutes until everything has fallen apart and looks like a very nice pasta sauce. Take the pot from the heat source and add the bread broken in small pieces, pushing it inside the soup. Wait for an extra 30 minutes or so, until the bread has absorbed all the moisture. At that point, whisk the soup vigorously until it looks like porridge. Season with salt and pepper, add the basil leaves finely chopped, perhaps a bit more oil, reheat gently and serve:

Friday, 28 April 2006

Beetroot and Chocolate Cake

Beetroot bunches are pretty nice to look at. We can't resist buying them, but we struggle to find interesting things to do with these things! We have recently acquired a taste for the leaves: wash them carefully and put them in a saucepan that has a tight-fitting lid. Add just a bit of water, half a glass or so, a slug of olive oil, a few rocks of salt, and put the pan with the lid on to sweat the leaves under high heat. Turn the leaves around a few times and make sure you don't overcook them. We find them a very nice treat, just with an added slug of olive oil and perhaps a few drops of balsamic vinegar. The texture is amazing, very chewy, and the taste quite intriguing.

The other success we've had is to use the beetroots themselves in a chocolate cake. There are quite a lot of recipes for this on the web, the one we use is inspired in all of them! It's hard to detect the presence of the beetroot in the final cake --- but it's there. There's this earthy aftertaste, reminiscent of clay, something hard to explain. The beetroot certainly prevents the cake from drying out, keeps it nice and moist. This is the kind of cake that improves quite a bit with keeping, somehow the beetroot's presence becomes more evident as time progresses.

Ingredients:

-75 g cocoa powder
-180 g all-purpose flour
-1 tsp baking powder
-250 g caster sugar
-250 g beetroot (cooked, say 3 small ones)
-3 large eggs
-200 ml of oil
-1 tsp vanilla extract

Trim the beetroots and wash them carefully. Do not peel them. Put them in a pressure cooker and boil for 10 minutes (after the whistle). Once the beetroot is warm enough to handle, the peel will come off quite easily. The colour is just astonishing! Using a food mill or a food processor, turn the beetroot into a puree (here's when you weigh the beetroot to make sure you have about 250g.) You can also mash them just using a fork, this way the cake will have more structure to it.

In a bowl, mix the beetroot puree with the oil, the vanilla extract, and the eggs. Add all the dry ingredients, mix everything very well, and tip this mixture into a baking tin that has been lined with baking paper. We used a square 20cm tin. Bake at 180 C for about an hour. It does not rise a lot.

Wednesday, 26 April 2006

Playing with food I

Buffalo Wings

In a quest to feel in our soul the sun that we cannot feel on our skin and bodies, we decided to try to replicate the chicken wings that we so many times enjoyed while we were living in the US. At this time of the year the weather is already quite warm in the area where we used to live --- most people are by now already pumping their AC full blast! I am afraid that's not quite the case in England...

Making fairly good chicken wings turned out to be quite easy and embarrassingly cheap. A kilogram of chicken wings is a bit more than a pound (of the sterling kind!), and the only other ingredients you need are Tabasco sauce and a chunk of butter! The other kick was a 4-pack of Sol, a Mexican beer that is heaven with spicy food. Simple pleasures...

Ingredients:
- 1 kg of chicken wings
- 25 g of butter
- 25 ml of Tabasco sauce (half a small bottle)
- salt and pepper to taste

Run the chicken wings under cold water, pick any obvious feathers, and joint them. The end bony bit is discarded. We froze these and will use them for stock. Pat the wings dry with paper towels, spread them on a roasting tin, season with salt and pepper, and roast on a very hot oven for about 30 minutes, turning them over once or twice. You want the wings to be fully cooked, but not dry, and crisp on the outside.

Once the wings are cooked, melt the butter in a saucepan and add to it the Tabasco sauce. Let it boil for a few seconds and thoroughly coat the wings with this mixture in a serving dish.

People usually have these wings with a blue cheese sauce and celery. We prefer to have them just with an ice-cold beer and maybe a few chunks of crunchy bread. Easy does it!

Mushroom Omelette

To cook an omelette comme il faut is not an easy task. I have never read much about the subject, and what I will describe is essentially the technique I arrived to after much trial and error. It also fits our personal taste, but there may be a better omelette out there, just waiting for us!

We recently bought a 20cm non-stick frying pan essentially to be used only when cooking eggs. It was expensive, but it is beautifully made and it seems to be a high quality addition to our kitchen. We think there isn't really the need for non-stick except for this purpose. If we manage to use it only for eggs, we expect that the pan will last for a long time and that we will be able to take plenty of pleasure from it.

This is how we presently make a 2-egg mushroom omelette:

Thickly slice a few mushrooms. Shitake are nice, but anything you have around is fine. We find that mushrooms are usually full of moisture, so we keep them outside the stupid plastic package they usually come in for a few days, on the kitchen counter, before using them.

Put a bit of olive oil or any other fat you fancy on your omelette pan. You can fry a small clove of garlic, thinly minced, in the oil if you like. The better the pan, the less fat you need. Once the oil is hot, add the mushrooms to the pan. Let them cook. There is really no rule here, it depends on the mushrooms. But try not to hurry, if it gets too hot take the pan out of the heat source and let the mushrooms release a bit of moisture. Add a few rocks of salt also --- but be gentle.

While this is taking place, lightly beat two eggs in a bowl with a bit of black pepper and some salt. Add some water to the eggs, just a bit. I find that water works better than milk or cream --- my taste. I recall reading somewhere that there are reasons to use the water and not milk. Also, wash and pat dry a few parsley leaves, which you then coarsely chop. Something like 2 tablespoons of parsley is about right.

When the mushrooms are ready, add the beaten eggs to the pan. Let this fry until the frying surface hardens. At that point, lift a bit of the edge of the omelette and tilt the pan so that uncooked egg that is on the top goes under the omelette. Do this around the whole perimeter of the omelette. The idea is to cook as much egg as possible before folding the omelette --- but not too much. You want the top still raw and creamy when you sprinkle the parsley on it. At that point, fold the omelette in half. Let it cook a bit more, and then place a plate on top of the pan and, with a quick move, turn the omelette onto the plate. This is done so that you can turn it and cook the other side a bit more.

The omelette should have an appetizing golden exterior and a fluffy, wet and creamy interior. Practice is the key. I am still working towards perfection!